
- A Detailed Guide to Subtitling with Reaper
- Quick and Easy Subtitling from a Transcript using Reaper and Subtitle Workshop
- Better Subtitling with SWS v2.6.0 and Custom EEL Scripts
REAPER v5, Text Items and Scripts: Subtitling, Faster Than Ever! / ExtremRaym
Introduction
Subtitling has always been long and hard… The thing is that it can’t really be automated. You have to define timecode yourself, rewritte the scenario…
Unless that Reaper, our favorite DAW, is capable to help us on some parts of the process ?
Yes, imagine, if you could prepare the subtitles of a project with the name, the position and the duration of the audio items it has…
Or if you could use the waveformes as a visual help to define timecodes which will be useful for subtitling…
AH HA ! I can see you become curious 😀
The SWS (extension for Reaper) Developers have understood that there was a potential behind this, potential that we will use to its maximum, first in seeing theorical concepts and then practical examples.
Elaborate this workflow take me a lot and experiences, I hope you will find them useful 🙂
This article is a bit long because it has a lot of details, but don’t worry, when we know what we have to do, it’s fast to apply !
Tutorials Details
- Duration: depends on the project initial duration
- Difficulty: advanced
- Pré-required : now basic functions of Reaper
- OS : Windows
- Softwares :
- Cockos Reaper 4.61
- SWS 2.4.0 pour Reaper
- Macro Recorder 5.7.4.0
- Subtitle Edit 3.3.14
- Notepad Windows
- Subtitle Workshop 6.0b
SWS and Subtitles Actions in Reaper
Reaper is, if I’m not wrong, the only DAW capable of handling subtitles. It can’t do it natively, it needs the awesome SWS Extensions, which can bring its power to the next level.
There is not so many SWS actions associated with subtitling. In fact… there is five. Some feature requests has been proposed (by my-self :P) in order to have more, but they are, without surprise, not very supported. It’s normal, there is most important things to do, subtitling in Reaper doesn’t interest a lot of people.
But this five actions are powerful, and combined with keyboard shortcuts and macros in a external software, you will be able to do everything you need.
Notes Window and Subtitling
Some actions are associated with the Notes window, which can show subtitles linked to a region (regions subtitles), subtitles linked to markers (subtitles regions), both, and the import/export button. It can also display other things, that don’t interest us in this tutorial.
Because subtitles files are just text with a timecode in and timecode out point, it is more clever to use subtitles with regions than with markers. It is, in fact, the default behavior when we import subtitles.

Importing SRT Subtitles
Before importing subtitles, I advice you to export your actual regions list, if you do have one, in a external file, with the region/marker manager window. Then, you can delete all regions with SWS: Delete all regions.
You can import subtitles in a Reaper project, from a SRT file with the action SWS/S&M – Import subtiles file…. They will be converted in regions, with subtitles information (regions subtitles) and those regions will have “Subtitles” follow by “#” and their index number as name. For example: Subtitles #1.
If the first part of the action is great, the second is not. It is not really handy to display subtitles just by their index, especially when the region number is already equal to the subtitle index (useless repetition of datas).
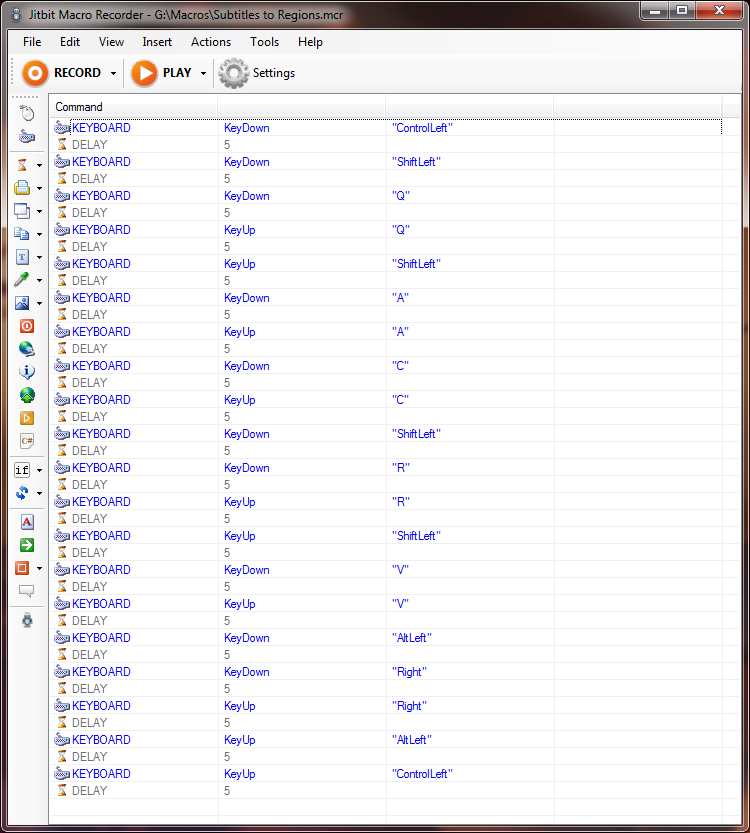
The copy/paste action for text fields are not possible in Reaper, we cannot create custom actions to correct this. We will have to use a macro software in order to convert regions subtitles into region names.

In order to assist the programming of our macros (we will create an other one later), we will define keyboard shortcuts for every action that would be useful to us. this way, the macros will be just a succession of keyboard shortcuts (no mouse involved). It is more reliable and it allows to execute them no matter the window(s) position. Our keyboard shortcuts are :
- SWS/S&M: Open/close Notes window (region subtitles) ► Ctrl + Maj + Q
- SWS/S&M: Open/close Notes window (region names) ► Ctrl + Maj + R
- SWS: Goto/select next region/marker ► Ctrl + Alt + →
No matter how difficult they are because you won’t do it manually. You can choose the shortcuts you want, as long as you don’t forget to adjust your macros.
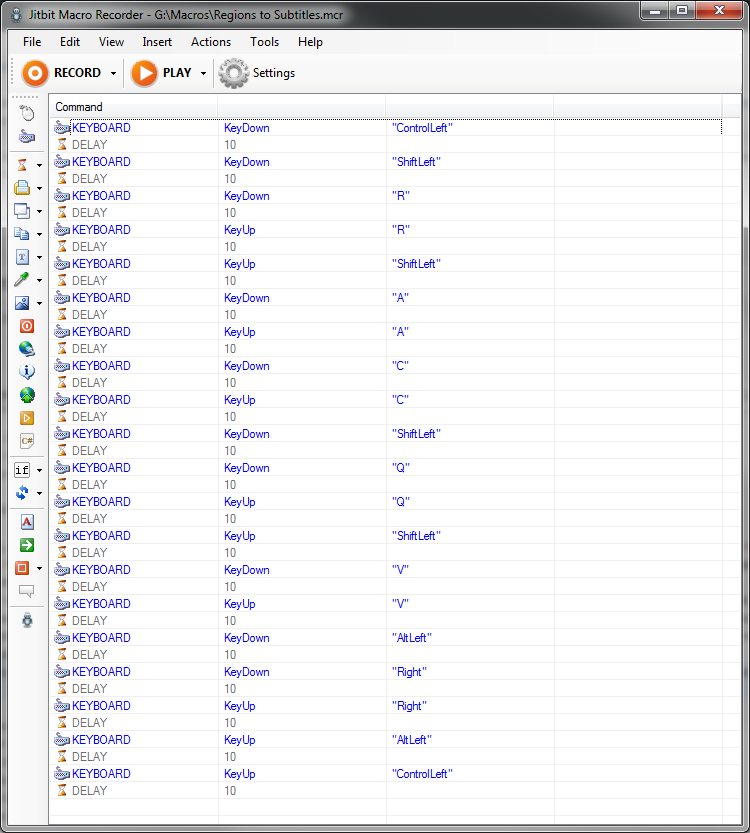
In order to create your macros, you can use Macro Recorder from JitBit.
You can either record it, and then clean it to keep just the essential, or programm it.
I choose to programm with keyboard shortcuts only, with a delay of 5ms, which is the minimum delay I could do (if less, the macros were broken because the windows doesn’t have the time to display). It is possible that you need less/more, depending on your computer.
I’m sure that there is ways to optimize the macros with the clipboard and opening windows functionality offered by Macro Recorder, but I’m pretty happy with that, a long movie is done in few minutes like that.
You can also download the files I made for you:
Download “Reaper Subtitles Macro”
ReaperSubtitlesMacros_X-Raym.zip – Downloaded 3841 times – 1.93 KBIt’s even simpler 😀
In every case, the actions that needed to be execute are :
- Open the region subtitles window ► Ctrl + Maj + Q
- Select all the text ► Ctrl + A
- Copy ► Ctrl + C
- Open the region name window ► Ctrl + Maj + R
- Paste ► Ctrl + V
- Go to next region ► Ctrl + Alt + →
Before executing your macro, be sure that the text in the Notes window is unlocked. Lock the text allow us to see it full size, which is very handy to navigate in a project, but this doesn’t allow its selection. In order to lock/unlock it, you just have to click on the top left icon the the Notes window.
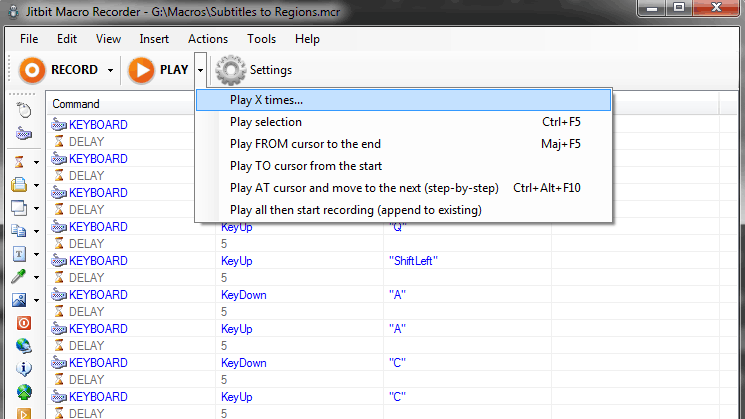
Then, you just have to execute the action X times, where X is the number of subtitles you have, and HOP you can see your regions be re-nammed in front of you !

Exporting SRT Subtitles
Once you have regions with regions subtitles, you can export subtitles files with the Notes window or with the Actions window. Once again, the text must be unlocked. The export format is SRT, the most common subtitles format, encoded in UTF-8.

Examples
Subtitles from a Reaper Project
Within Reaper
You made a song, you are making the audio post-production of a video, you just made an audio story… If like me you like to be able to identify every piece of audio at first sight, you surely already spend time to name your audio items semanticly, with dialog lines (not : Audio-4_5.wav).
Naming take is so useful to me that I set a one single letter shortcut, D, to the function Xenakios/SWS: Renames takes…, then I defined macros on my macro keyboard for copy the selected text of an Open Office document (the scenario) and highlight it then rename the take (within Reaper) with the clipboard content. I skip the details, not everyone has a keyboard with extra keys (that said, you can still use Macro Recorder), but the idea behind this is that all my dialog lines and lyrics are set in my Reaper project as take name. For a 30 minutes audio story project with more than 700 audio items, I let you imagine how handy this become.

You can imagine than from this (audio item named with the dialog lines it corresponds), to the desire to export this automaticly in SRT, there is just one step.
What we want is pretty simple : convert take names into regions subtitles.
But there is no action to do that. First, you have to create a custom one, that we can call Create regions named with visible takes. This is the actions it executes :
- SWS: Delete all regions
- Item: Select all items
- SWS: Create regions from sel item(s) named with take
- Item: Unselect all items
- Transport: Go to start of project

Now hide every tracks without any audio item corresponding to a dialog line.
Then, we can execute our custom action : regions are created from visible audio takes, with the same name and same in/out point.
Unfortunately, this doesn’t make subtitles regions. We will have to use Macro Recorder to convert the region names into region subtitles with the following steps :
- Open the Notes window (region names) ► Ctrl + Maj + R
- Select the text ► Ctrl + A
- Copy ► Ctrl + C
- Open the Notes window (region subtitles) ► Ctrl + Maj + Q
- Paste ► Ctrl + V
- Goto next Region ► Ctrl + Alt + →
You sould notice that is is almost the inverse of our previous macro, Subtitles to Regions 😀
You then have to Play the Macro X times 😉 The next steps are outside Reaper.
Merge Consecutive Subtitles With Same Text
If you use a lot the comping technique, and that your dialog lines are mixes of several audio takes (with takes named with the entire dialog line, as I do), you will surely have regions (and so, subtitles) with same text that overlap. There is no way to deal with that in Reaper.

It’s not bad, other softwares can handle that. You just have to export your subtitles in SRT, and import it in one of them. My choice for this task is Subtitle Edit, which do that perfectly. The action is under Tools > Merge Line With Same Text… and you can choose the duraction of the overlap.

Notice that if two characters in your story has the same dialog lines consecutively, it is possible that this process merges these dialog lines. You will have to rewritte those which disappeared in a subtitle software. It’s a small step back, but compare to the time we saved, it really worths it 😀
My trick : two audio takes with same dialog line from several characters don’t have the same name (I add some text in the second take name).
Subtitle a one audio track project
You want to subtitle a project that just have one audio track, because it was already edited or because it was a one shot recording.
You don’t have to use Reaper for that of course, you can use a subtitle software directly. But few of them can handle subtitles without video, and a minority can display waveforms, which is yet handy to subtitle a project.
The idea is to use Reaper to prepare the subtitles timecodes, before refine those in a dedicated software. Better than split the original track in several items, I can advice you to create empty MIDI items in a secondary track, and then to define their in and out point according to the dialog lines, and then renaming it… Next, you just have to use that we see in the previous example and export it 🙂
EDIT (30/06/2014) : I just writte an other article (Le Sous-Titrage Facile et Rapide – Tutoriel Reaper & Subtitle Workshop), with a practical exemple in a real time video, that shows how synch subtitles from a transcript using Reaper, with an up to date optimized worklow ! 🙂

Subtitling softwares
It is obvious that functionnalities specific to subtitling have to be done in subtitling softwares. Overlapping, translation, minimum duration between two subtitles, number of lines, display of the letters/second speed, adjustements with the number of frames per second…
Subtitling in Reaper basicly stops at importation / exportation / take names conversion / rough timecode (which is already good :).
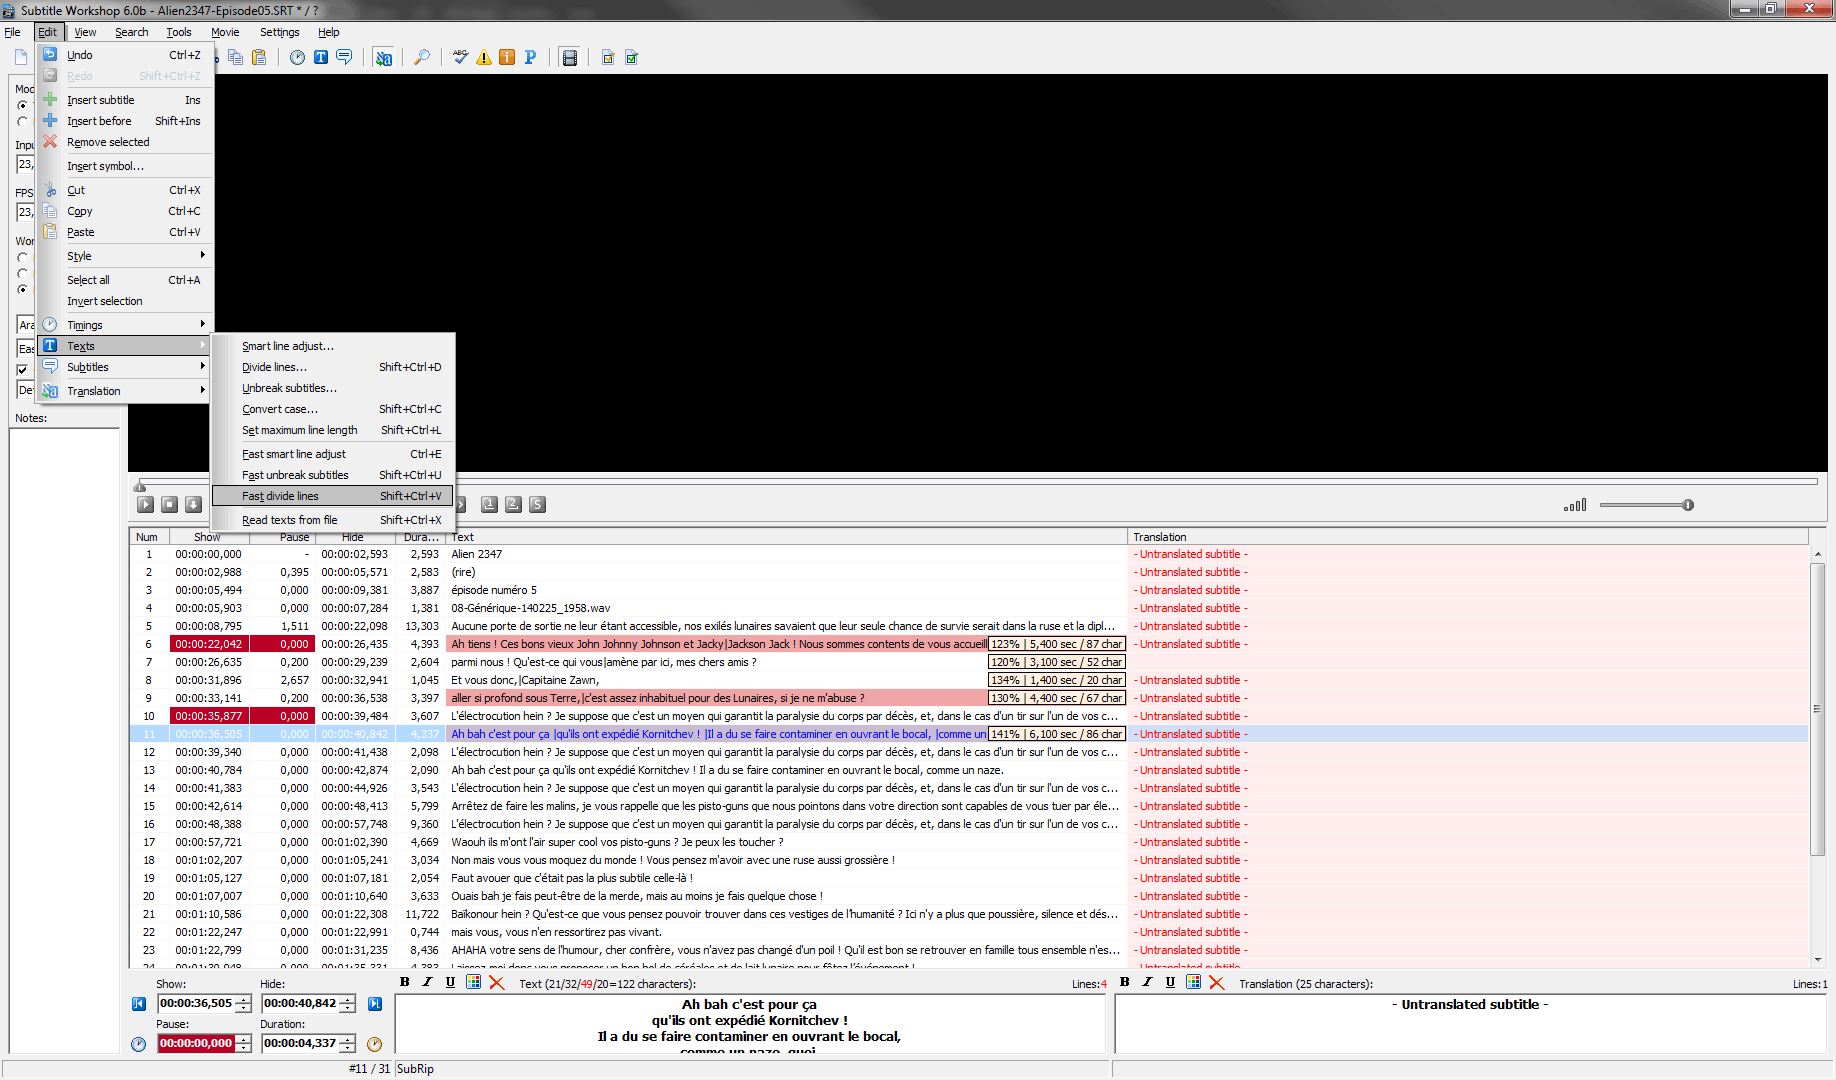
I advice you to use Subtitle Workshop, a freeware which as great features. The problem is that is doesn’t support the UTF-8 for the moment (it is announced, but meanwhile…), which causes problems with special characters use in other language than English (accent etc…).
You will need to convert your subtitle (generated by Reaper, or saved by Subtitle Edit) file into ANSI.
To do so, you can open your subtitles file with the basic Notepad Windows, and then save it as follow : File ► Save as and choose Encoding : ANSI. It is an older and not really optimized format, but it offers a better compatibility (like often with old formats). You can still reconvert it in UFT-8 as a final step.

I take advantage of the fact that I’m on Notepad to make my break-lines, which is far mo faster than in a subtitle editor.
I will not learn you how to use Subtitle Workshop. But I can show you a great feature, that none of the alternative have : the possibility to have a huge number of lines by subtitle and to split subtitle where there is line breaks.
This way, if your dialog line is too long, you shape it with line breaks, and then you do Edit ► Text ► Fast Divides Line several times, until it’s good. The out point of the first subtitle created this way is calculated in function of the number of letter it has.
Conversely if you want to combine subttiles, it is possible with Edit ► Subtitles ► Combine Subtitles but don’t forget to add a quotadion dash “—” if it’s an other character who speak. You should learn the keyboard shortcuts of this two functions in order to save time.
Other functions with subtitles timing (make a subtitle lasts until the next one, define a minimum duration bewteen two subtitles…) will allow you to polish your subtitles.
Other strong point : a side by side view for translation purpose 🙂
With this few functions, you will be able to have good subtitles easily 🙂
Advices for more Profressional Subtitling
What we just see allows us to have good subtitles quickly. But if you want them to be better, more readable and “transparant” for the reader, we can have a look to what is done with professionals in TV and Cinema.
Rules are not the same between the studios and channels : it’s not an hard science, you can do what you want. But to respect some of them, at least approximately, will give to your subtitles a good look, and they will be more accepted by the readers, who will recognize a style they already know. If you already see a more than two lines subtitle, you know what I’m talking about 😛
Time and patience, it is in these small details that we will recognize subtitles made by profressionals. As global guideline, you can use :
- No more than two lines
- About 40 letters by lines
- Semantic line breaks (after punctuation, before a group of words with the same function in the sentence, etc…) in order to avoid widows and orphans.
I have more professional advices to share (30 pages PDF files) but because it’s for French subtitling, you will find it on the French page of this article. I’m pretty sure you can find some equivalent online for English subtitling, written in english. Don’t hesitate to share if you find good ressources 🙂
Conclusion
What you have to retain from all this, it’s that we can elaborate subtiles in Reaper pretty quickly. You have to clean and adjust the result in dedicated software, but the fact that Reaper can be integrated in the process can make some things easier, especially if your project was created in Reaper (like for an Audio Story for exemple) for which you already paste dialog lines as take names. Quite good, isn’t it ? 🙂 Simple splits of your long dialog lines, basic adjustement of in and out point, and your subtitles will be good. But you can still make it better if you have time for this 😀
Once you have finished your subtitles, you can convert it back to UTF-8 if needed, and re-import it back into Reaper 🙂
I hope you liked this tutorial, it was very technical and took me a lot of time to find all this (and more again to writte the article), but if more and more users use Reaper for subtitling, I think we can imagine that some steps will become easier to realize 😀 don’t hesitate to support this Feature Request for example 🙂 But I can’t pomise anything, I am not a member of the SWS developpement team 😛
Future softwares enhancements are coming for subtitles software too. We now have to do a lot of tricks to do what we want, but nothing impossile 😛
Good subtitling !
Screenshots from : Alien 2347 by X-Raym, Extraterreur by X-Raym (subtitled by Lwyz)
Reaper Forum Thread : A Detailed Guide to Subtitling with Reaper
- A Detailed Guide to Subtitling with Reaper
- Quick and Easy Subtitling from a Transcript using Reaper and Subtitle Workshop
- Better Subtitling with SWS v2.6.0 and Custom EEL Scripts